Table of Contents
If you love Japanese cuisine and are looking for a quick, versatile meal, look no further than the Onigirazu Rice Sandwich. A modern twist on traditional onigiri, onigirazu combines the simplicity of sushi rice with your favorite fillings, wrapped in a convenient, handheld form. Perfect for lunchboxes, picnics, or a satisfying snack, this dish is as fun to make as it is to eat.
In this guide, we’ll walk you through the five simple steps to create your own onigirazu, complete with tips to make them look and taste incredible.
Why Onigirazu Is a Must-Try Dish
Onigirazu takes the beloved flavors of Japan and transforms them into an easy, customizable sandwich. Unlike traditional onigiri, which is molded into a triangular shape, onigirazu is a flat, square package that allows for more creative fillings and less pressure on perfect shaping. With the right balance of sushi rice, fillings, and nori (seaweed), this rice sandwich is a crowd-pleaser for all ages.
Ingredients for Onigirazu Rice Sandwich
Here’s what you’ll need to make four delicious onigirazu sandwiches:
| Ingredient | Quantity | Purpose |
|---|---|---|
| Sushi rice | 2 cups (cooked) | The base for the sandwich, providing the signature sticky and slightly tangy texture. |
| Nori sheets | 4 full sheets | Wraps the rice and fillings, keeping everything together and adding a touch of umami. |
| Protein of choice | 4-6 oz (e.g., grilled chicken, tuna, tofu) | Adds flavor and substance to the sandwich. |
| Fresh vegetables | 1 cup (e.g., lettuce, cucumber, carrots) | Provides crunch and freshness to balance the richness of the fillings. |
| Sauce or seasoning | 2-3 tablespoons | Enhances the flavor of the protein or veggies (e.g., soy sauce, mayonnaise, sriracha). |
Step-by-Step Recipe for Onigirazu
Step 1: Cook and Season the Sushi Rice
- Cook 2 cups of sushi rice according to the package instructions.
- Once cooked, transfer the rice to a large bowl and season it with 2 tablespoons of rice vinegar, 1 tablespoon of sugar, and a pinch of salt. Mix gently to avoid smashing the grains. Let the rice cool slightly.
Step 2: Prepare the Fillings
- Choose your protein: grilled chicken, smoked salmon, canned tuna, or even scrambled eggs work well.
- Slice fresh vegetables like cucumber, carrots, or lettuce into thin, manageable pieces.
- Have your favorite sauce ready for added flavor.
Step 3: Assemble the Onigirazu
- Place a sheet of nori on a clean surface or a sheet of plastic wrap, shiny side down.
- Spread a thin layer of rice (about 1/2 cup) in the center of the nori, forming a small square.
- Add your fillings: start with your protein, layer on the vegetables, and drizzle with your chosen sauce.
- Top the fillings with another thin layer of rice (about 1/2 cup).
Step 4: Wrap the Sandwich
- Fold the edges of the nori over the rice and fillings, creating a compact square package.
- Use plastic wrap to tightly secure the onigirazu and help it hold its shape.
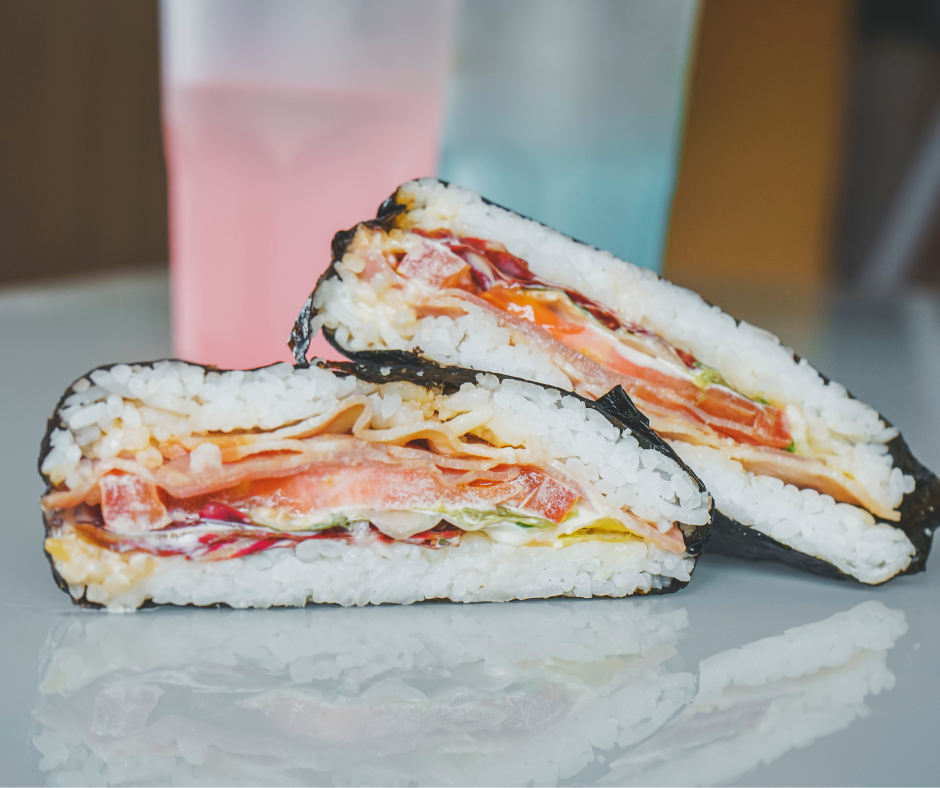
Step 5: Slice and Serve
- Let the onigirazu sit for a few minutes to allow the nori to soften slightly.
- Use a sharp knife to slice the sandwich in half, revealing the beautiful layers inside. Serve immediately or pack for later.
Tips for the Perfect Onigirazu
- Wet Your Hands: When handling sushi rice, wet your hands with water to prevent sticking.
- Customize Your Fillings: Experiment with different combinations, such as teriyaki chicken, avocado, or spicy mayo shrimp.
- Don’t Overfill: Too many ingredients can make the onigirazu difficult to wrap and eat.
- Use Fresh Nori: Fresh, high-quality nori is key to a flavorful and easy-to-wrap sandwich.
- Store Properly: If making ahead, keep the onigirazu refrigerated in an airtight container to maintain freshness.
Popular Variations of Onigirazu Rice Sandwich
- Vegetarian Onigirazu: Fill with avocado, pickled radish, and tofu for a plant-based option.
- Breakfast Onigirazu: Use scrambled eggs, bacon, and spinach for a morning twist.
- Spicy Tuna Onigirazu: Combine canned tuna with sriracha and mayonnaise for a flavorful kick.
- Katsu Onigirazu: Include breaded pork or chicken cutlet for a hearty and satisfying meal.


FAQs About Onigirazu Rice Sandwich
Q: Can I use regular rice instead of sushi rice?
A: Sushi rice is preferred because of its sticky texture, which helps hold the sandwich together. Regular rice may not work as well.
Q: How do I keep the nori from getting soggy?
A: If packing for later, place a layer of lettuce between the rice and fillings to act as a barrier.
Q: Can I make onigirazu ahead of time?
A: Yes! Wrap each sandwich tightly in plastic wrap and store in the refrigerator for up to 24 hours.
Q: Do I need special tools to make onigirazu?
A: No special tools are required, but a sharp knife and plastic wrap make assembly and slicing easier.
Conclusion
The Onigirazu Rice Sandwich is a perfect fusion of simplicity and creativity. With just a few fresh ingredients and five easy steps, you can create a meal that’s not only delicious but also visually stunning. Whether you’re packing lunch, prepping for a picnic, or trying something new, onigirazu is sure to impress.
So, grab your favorite fillings and try making your own Onigirazu Rice Sandwich today. It’s a Japanese delight that’s as fun to make as it is to eat!
Enjoy Onigirazu Rice Sandwich